How ComponentFactoryResolver can unlock powerful higher-order components

Via ArtsyBee on Pixabay
If you work with any component-based framework long enough, you’ll run into a problem. How do you share functionality across components?
Angular gives us many options. You can share logic in services, child components or directives. However, sometimes these options are not enough. A directive can only modify an element, a service cannot display content, and a child component should not modify its parent.
Sometimes, the best option is to build a higher-order component. A higher-order component accepts another component as its input and “wraps” it. This is a common pattern in React and a great way to share logic across components without burdening them with extra service dependencies or logic.
With a little help from ComponentFactoryResolver, we can do this in Angular too.
Why use ComponentFactoryResolver?
Imagine you’re creating a dashboard with two tables, each with a different layout. As indicated below, the top table is for transactions, and the bottom table is for users.
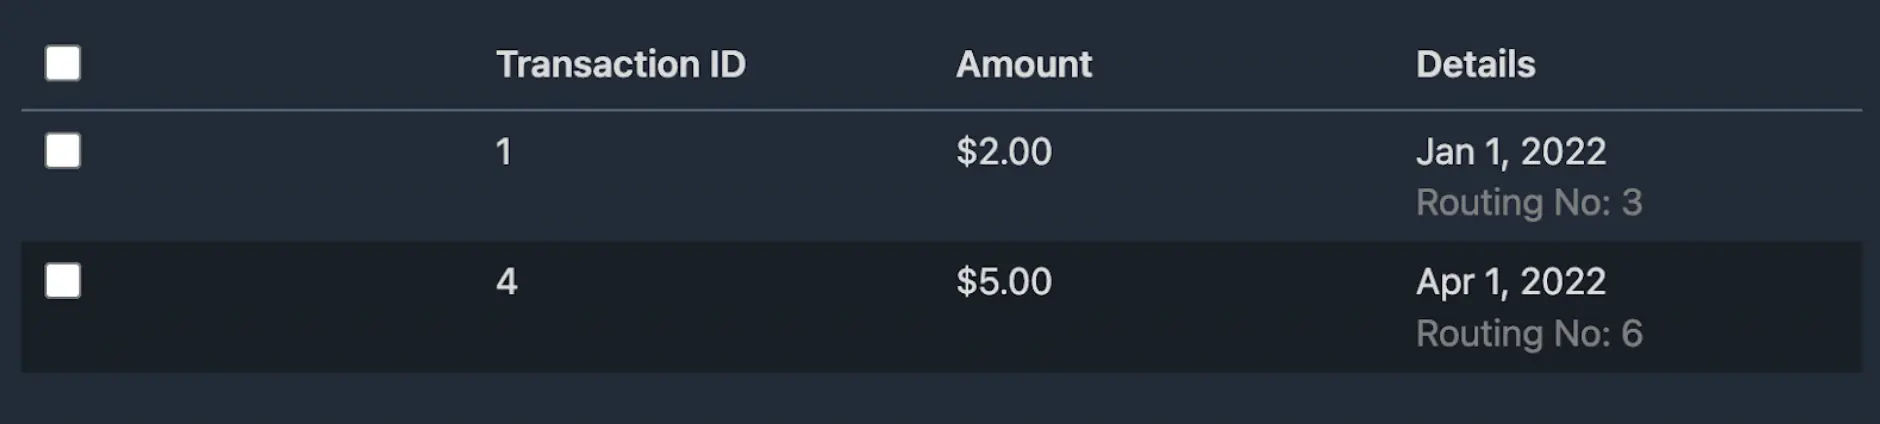

The transactions table has checkboxes and three columns showing a number, currency and date, respectively. While the user table also has a checkbox, it displays only two additional columns, the first rendering a string and the second a currency value .
On one hand, the checkbox logic for each table is the same and should be shared. On the other, how would you reconcile two radically different row layouts?
You could toggle between them with a switch statement, but the code would messy, large, and unreadable. And that’s before adding more columns in the future.
What we should do instead is create a higher-order checkbox table component that accepts a row component class as its input. This is how simple our final API will be:
<h1>Dashboard</h1>
<app-selectable-table
  [items]="transactions"
  [rowComponent]="TransactionRowComponent"
></app-selectable-table>
<div style="..."></div>
<app-selectable-table
  [items]="users"
  [rowComponent]="UserRowComponent"
></app-selectable-table>
ComponentFactoryResolver will let us write our checkbox logic once and dynamically render row components at runtime .
Creating the component using ComponentFactoryResolver and ViewContainerRef
The table will create instances of our row component and render them into a ViewContainerRefs attached to <tr>s in our template. A ViewContainerRef is a container where one or more views can be attached, resulting in a host views. A host view is a view for the component containing its data. This is how Angular creates and renders components behind the scenes.
To return to our table example, we will pass in two inputs: the row component class and an array of items to render.
@Input() items: Array<Identifiable>;
@Input() rowComponent: SelectableTableRowComponent;
We will inject our row component into the ViewContainerRef of each <tr>. Each row will display one item.
<div>
  <table>
    <thead>
      <tr>
        <th>
          <input type="checkbox" />
        </th>
        <th *ngFor="let header of rowComponent.tableHeaders">
          {{header}}
        </th>
      </tr>
    </thead>
    <tbodv>
    <tr #selectableRow *ngFor="let item of items" class="div-table-row"></tr>
    </tbody>
  </table>
</div>@ViewChildren('selectableRow', { read: ViewContainerRef 3) private readonly rowTemplates: QueryList<ViewContainerRef>;We will inject our row component into the ViewContainerRef of each <tr>. Each row will display one item.The ComponentFactoryResolver will resolve a factory for making rowComponentinstances. We will then assign the items of the table to instance.item. Finally, using the instance of the global Angular project, we will render the row component instance onto the page.
const rowComponentFactory =
  this._componentFactoryResolver.resolveComponentFactory(this.rowComponent);
const componentRef = rowComponentFactory.create(
  template.injector,
  undefined,
  template.element.nativeElement
);
componentRef.instance.item = this.items[i];
this._applicationRef.attachView(componentRef.hostView);
Content projection
Our table can now render the row components needed to display users and transactions. Now we need to display the checkboxes using ngContent inside our user row component.
<ng-content></ng-content>
<td>
  <strong>{{ item.name }}</strong>
</td>
<td>{{ item.pay | currency }}</td>
Back in the table component, make a <td>. You will inject the checkbox component into the <td>.
const checkboxTd = document.createElement('td");
const checkboxRef = checkboxFactory.create(
  template.injector,
  undefined,
  checkboxTd
);
We will need some logic to know if the checkbox is checked.
const itemId = this.items[1].id;
checkboxRef.instance.formControl = this.itemsSelected.get(
  itemId.toString()
) as FormControl;
checkboxRef.instance.id = Number(itemId);
checkboxRef.hostView.detectChanges();
We now pass the checkbox as the second parameter for projectableNodes.
const factory = this._componentFactoryResolver.resolveComponentFactory(
  this.rowComponent
);
const componentRef = factory.create(
  template.injector,
  [[checkboxTd]],
  template.element.nativeElement
);
componentRef.instance.item = this.items[i];
this._applicationRef.attachView(componentRef.hostView);
Putting this all together, we will have this block of code.
templates.forEach((template: ViewContainerRef, i: number) => {
  const checkboxTd = document.createElement('td');
  const checkboxRef = checkboxFactory.create(
    template.injector,
    undefined,
    checkboxTd
  );
  const itemId = this.items[i].id;
  checkboxRef.instance.formControl = this.itemsSelected.get(
    itemId.toString()
  ) as FormControl;
  checkboxRef.instance.id = Number(itemId);
  checkboxRef.hostView.detectChanges();
  const factory = this._componentFactoryResolver.resolveComponentFactory(
    this.rowComponent
  );
  const componentRef = factory.create(
    template.injector,
    [[checkboxTd]],
    template.element.nativeElement
  );
  componentRef.instance.item = this.items[i];
  this._applicationRef.attachView(componentRef.hostView);
});
The result of all this is our table that we can plug into and use throughout our application using ComponentFactoryResolver.
<h1>Dashboard</h1>
<app-selectable-table
  [items]="transactions"
  [rowComponent]="TransactionRowComponent"
></app-selectable-table>
<div style="..."></div>
<app-selectable-table
  [items]="users"
  [rowComponent]="UserRowComponent"
></app-selectable-table>
Using ComponentFactoryResolver in Angular 13
Angular 13 and newer no longer requires component factories. You can just inject an instance of a component class directly into a ViewContainerRef.
import { Component, ViewChild, ViewContainerRef } from '@angular/core';
import { SelectableTableRowCheckboxComponent } from '../selectable-table-row-checkbox/selectable-table-row-checkbox.component';

@Component({
  selector: 'app-factory-example',
  template:
    '<button (click)="add()">Add checkbox</button><ng-container #container></ng-container>'
})
export class FactoryExampleComponent {
  @ViewChild('container', { read: ViewContainerRef })
  private readonly container: ViewContainerRef;

  constructor();

  add() {
    const componentRef = this.container.createComponent(
      SelectableTableRowCheckboxComponent
    );
  }
}